Key Lime Blog Design: How To Make A Collage in Gimp |  |
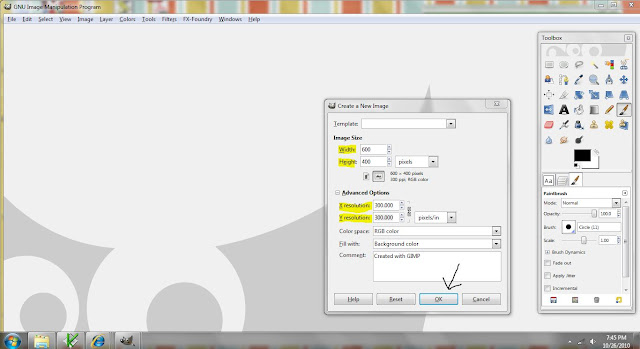
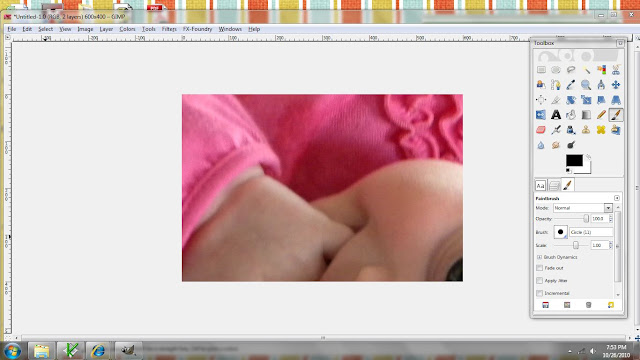
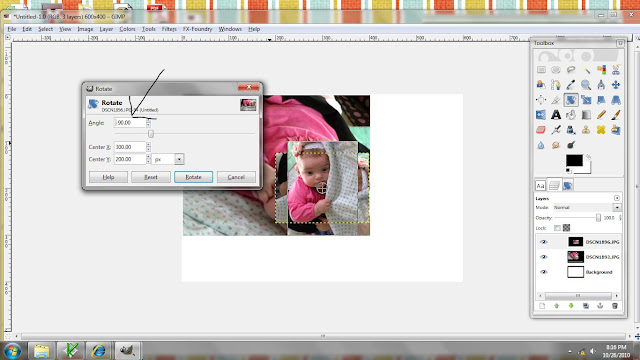
| Posted: 24 Apr 2011 11:00 AM PDT Gimp is a free photo editing program. Basically a free version of photoshop {minus some bells and whistles}. You can download gimp for free here! I’m going to show you how to make a collage similar to this one.This is a fun way to organize pictures in your blog post, especially if you have a lot of pictures you would like to share! Now lets get started! You can click on any picture you see it bigger. Open Gimp > File > New > Set Width and Height to whatever size you want. I am going to use 600 x 400. Change the x and y resolution to 300. Set “fill with” to background color. Now go to file > open as layer. Find the first picture you want to use and push ok. Your picture will probably be huge. Now click on the “layers tab” on the tool panel. Now right click on the layer that has your picture. Choose “scale layer” Change the width to 400. When you click in the height box it will automatically adjust to keep the right proportions for your picture. The press scale. Now we need to move the picture to where we want it. We need to select the “move” icon in the toolbar. Now click on you picture and drag it to where you want it. Now I am going to open another picture. File > Open as Layer > Add your picture. Then right click on the layer > scale layer. This time I am going to make the width 200 and the height 150. I want my picture to be rotated so I am going to click the “rotate tool” Click on the picture. This box will pop up. Rotate -90 degrees. Now move the picture {click the move tool} Now open your next picture. File > open as layer. Right click on the layer > scale layer This time I am doing width: 100 and height: 113 Now I am going to use the “crop tool” to cut off the extra background space. Now use the cursor to highlight the area you want to keep. Then click inside the area you are keeping. Now let’s add some text! Click the “text tool” Now click and make a box. It doesn’t matter where it is or how big it is. Type your text. You can change the font by clicking the tab that has “Aa” Once you pick your font you can change the size by clicking back on the “text tab” You can move your text by clicking and dragging. Now I am going to make one final crop. Ta da! Now you have a picture collage. To save: File > Save As > type your file name and add .jpg to the end There are so many ways to use gimp! Experiment & have fun! If you have any questions or get stuck at all leave a comment or email me. |
| You are subscribed to email updates from Key Lime Digital Designs To stop receiving these emails, you may unsubscribe now. | Email delivery powered by Google |
| Google Inc., 20 West Kinzie, Chicago IL USA 60610 | |







No comments:
Post a Comment